How to Get New Leads by Running Meta Click to WhatsApp Ads
Create Meta Leads campaigns that open WhatsApp chats, connect your number in Ads Manager, and use CXWizard AI to qualify leads, answer FAQs, and close customers.
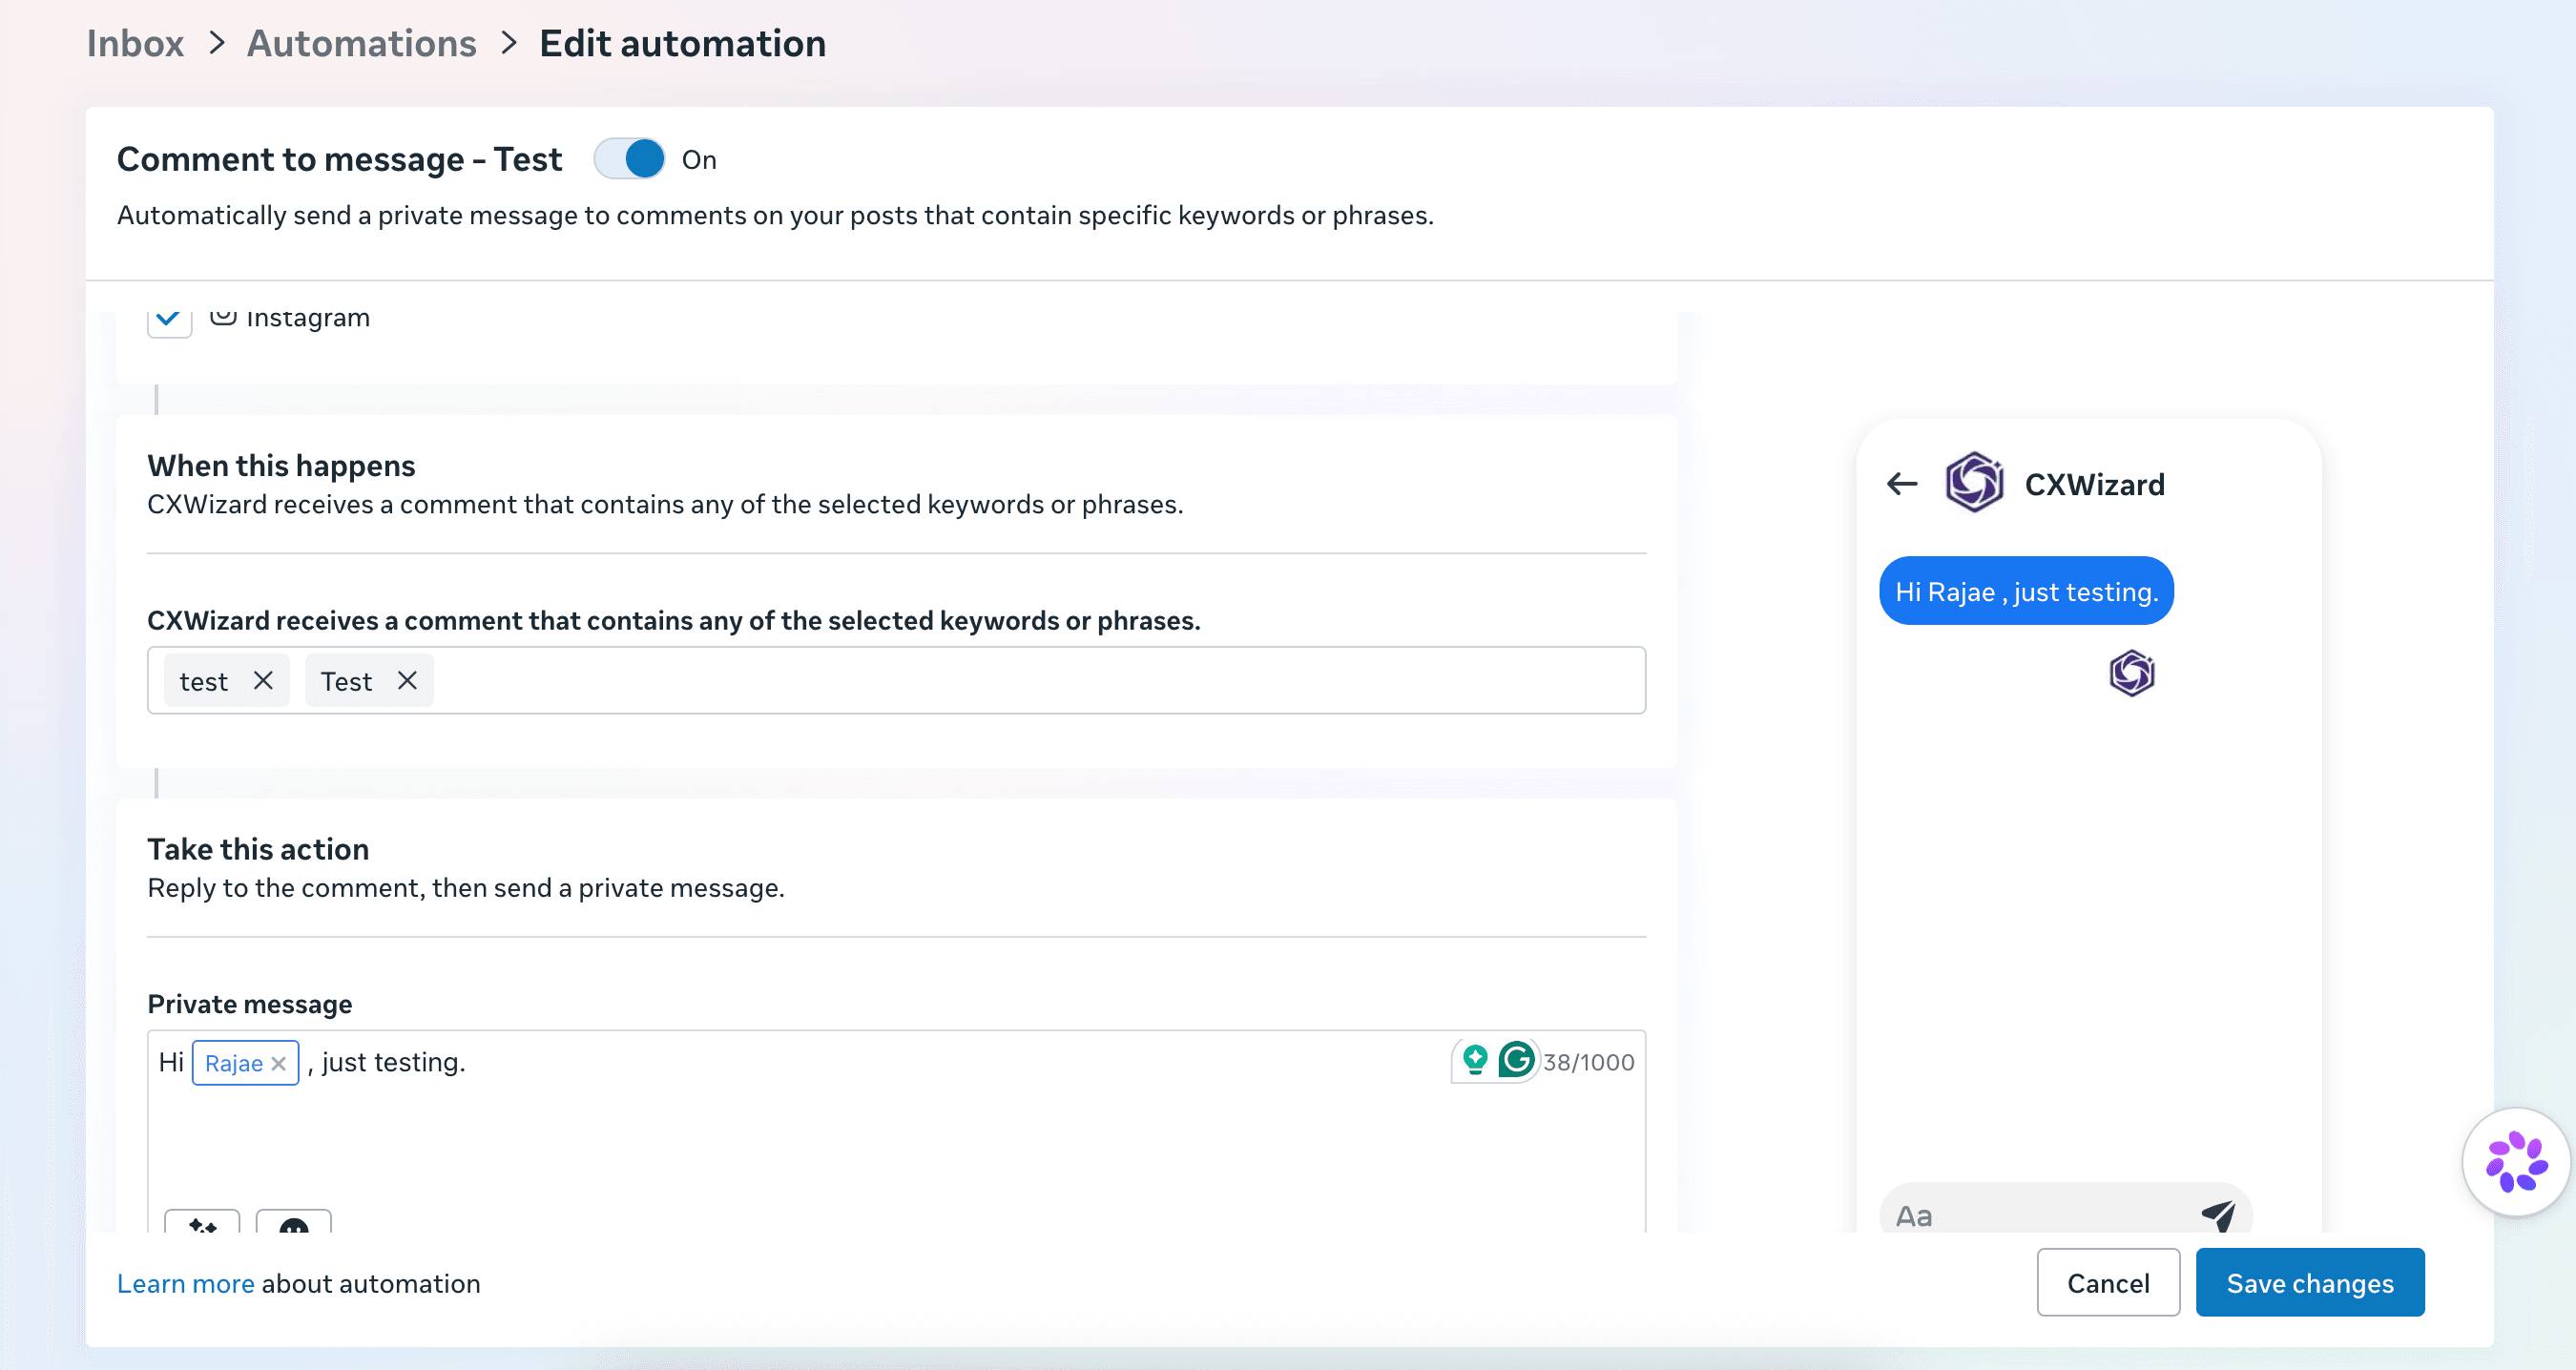
Click to WhatsApp ads (CTWA) send people from Facebook or Instagram straight into a WhatsApp chat with your business. Instead of filling a form and waiting for a callback, the lead starts a conversation in one tap.
That is powerful for lead volume, but only if you can reply quickly. When ads send dozens or hundreds of chats a day, manual replies fall behind. Pair Meta’s ad setup with a CXWizard AI agent so every new WhatsApp conversation can qualify the lead, answer FAQs and objections, and help close the sale.
This guide walks through creating a Leads campaign in Meta Ads Manager with WhatsApp as the conversion location, connecting your number, then handing conversations to CXWizard.
Before you start
Make sure you have:
- Access to Meta Ads Manager for the ad account you want to use
- A Facebook Page connected to the WhatsApp number that will receive chats
- A WhatsApp Business number ready to use for ads (the same number you want CXWizard to automate)
- Optional but strongly recommended: a CXWizard account with WhatsApp connected so AI can respond when leads message you
If you still need to connect WhatsApp to CXWizard, see How to Connect Your WhatsApp Business Account to CXWizard.
Step 1: Open Ads Manager and create a campaign
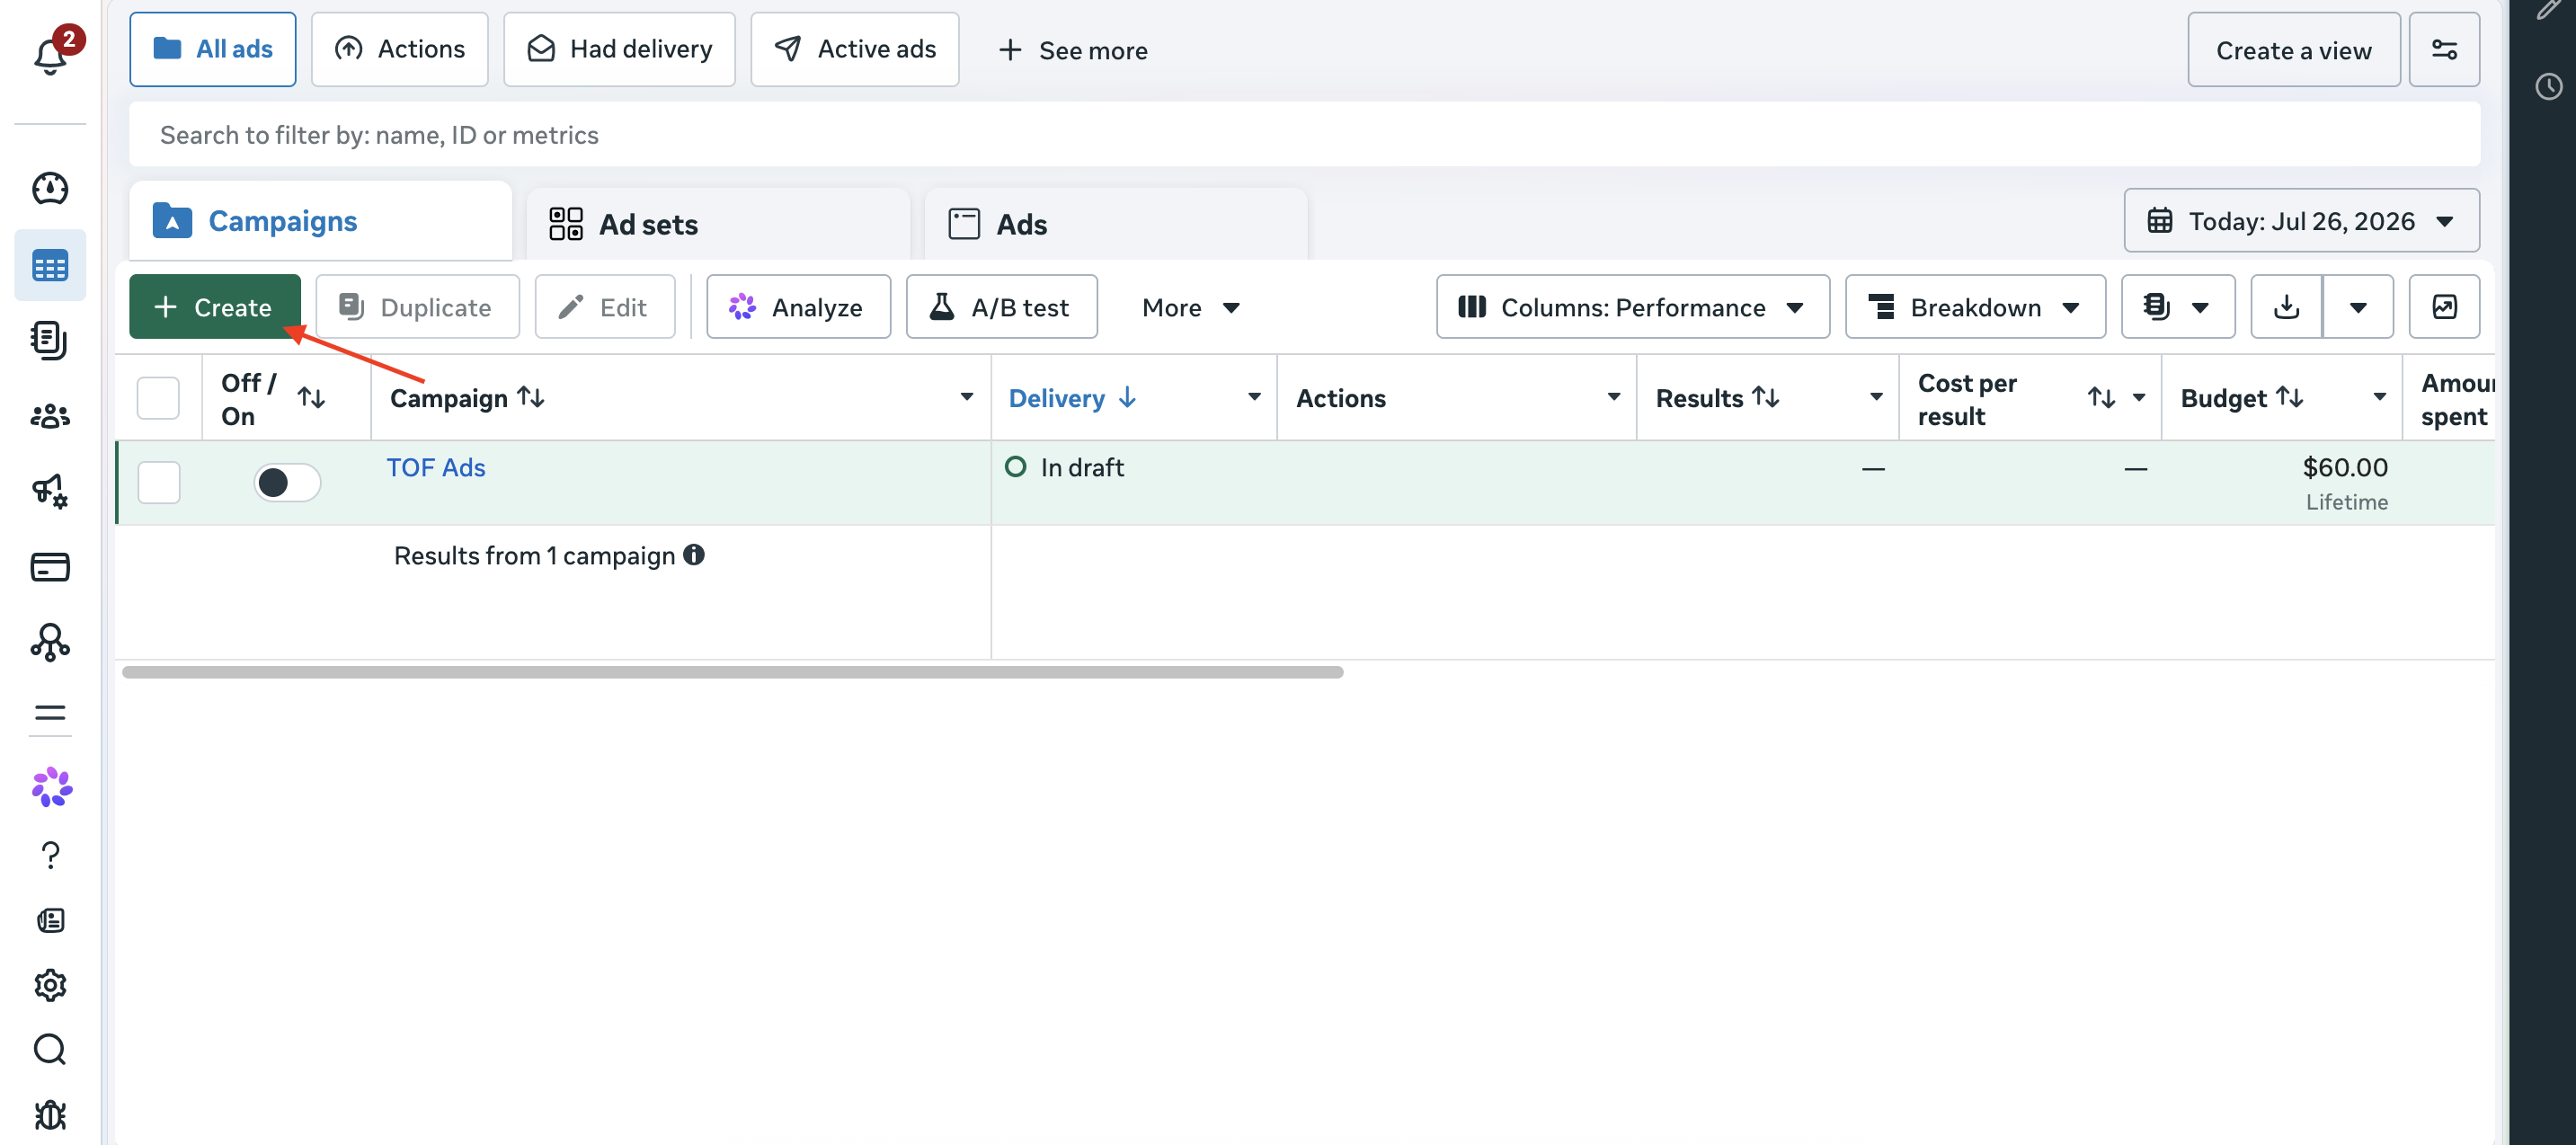
Go to Meta Ads Manager and open the Campaigns tab.
Click the green + Create button at the top of the campaign list.
Step 2: Choose the Leads campaign objective
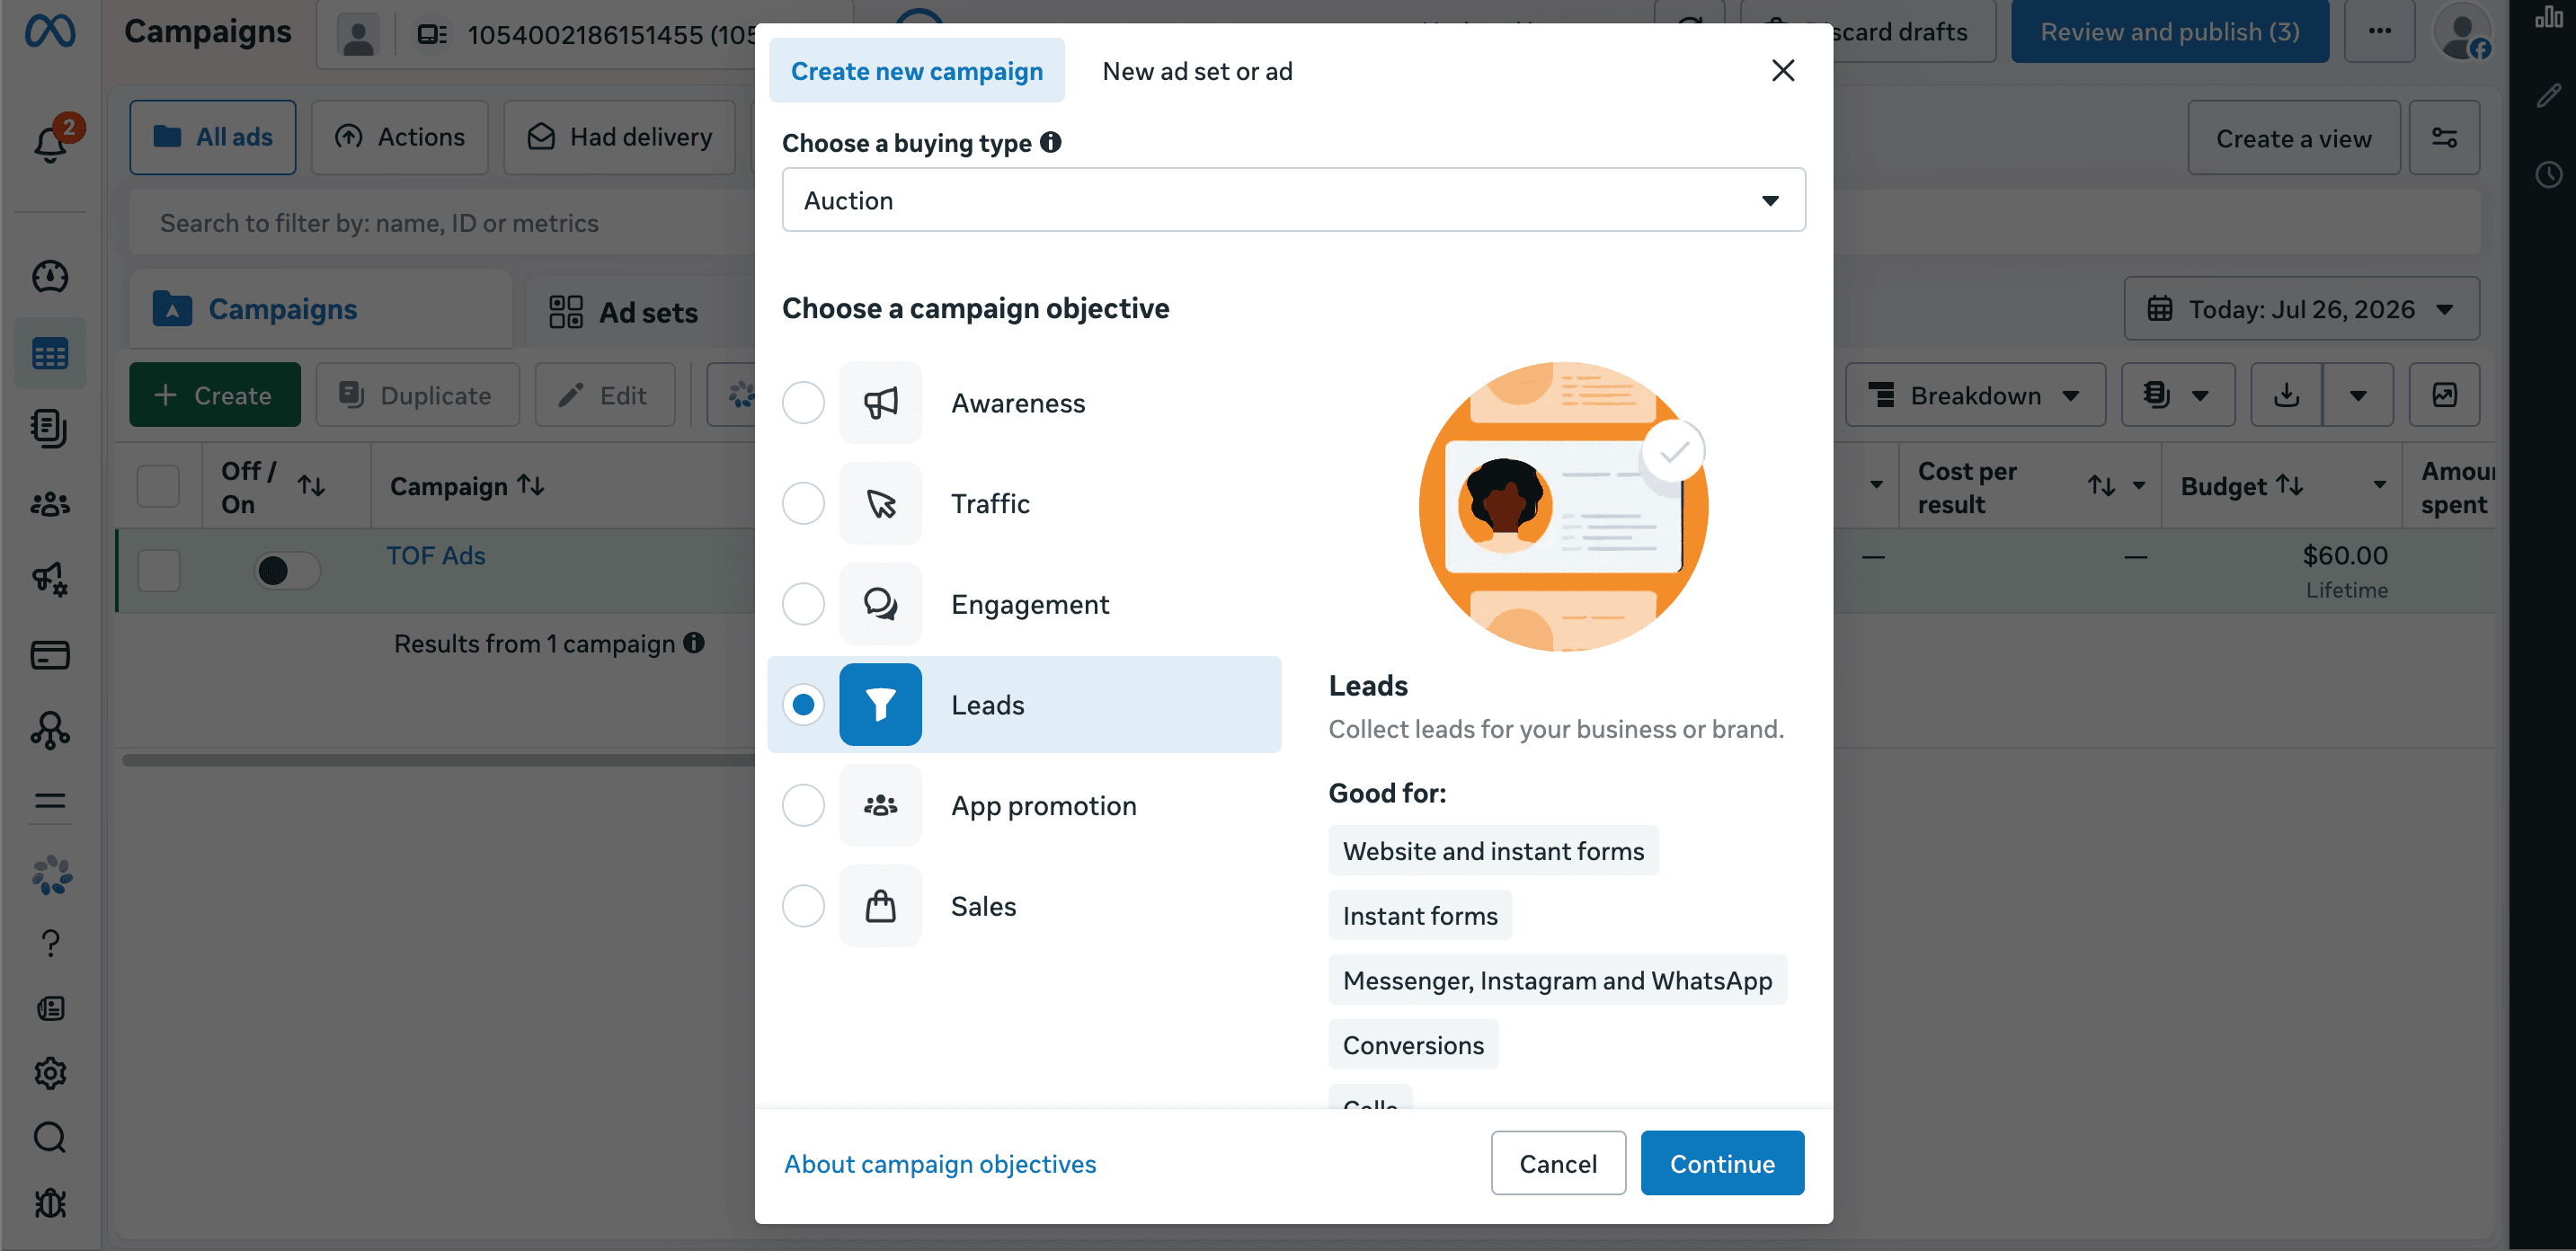
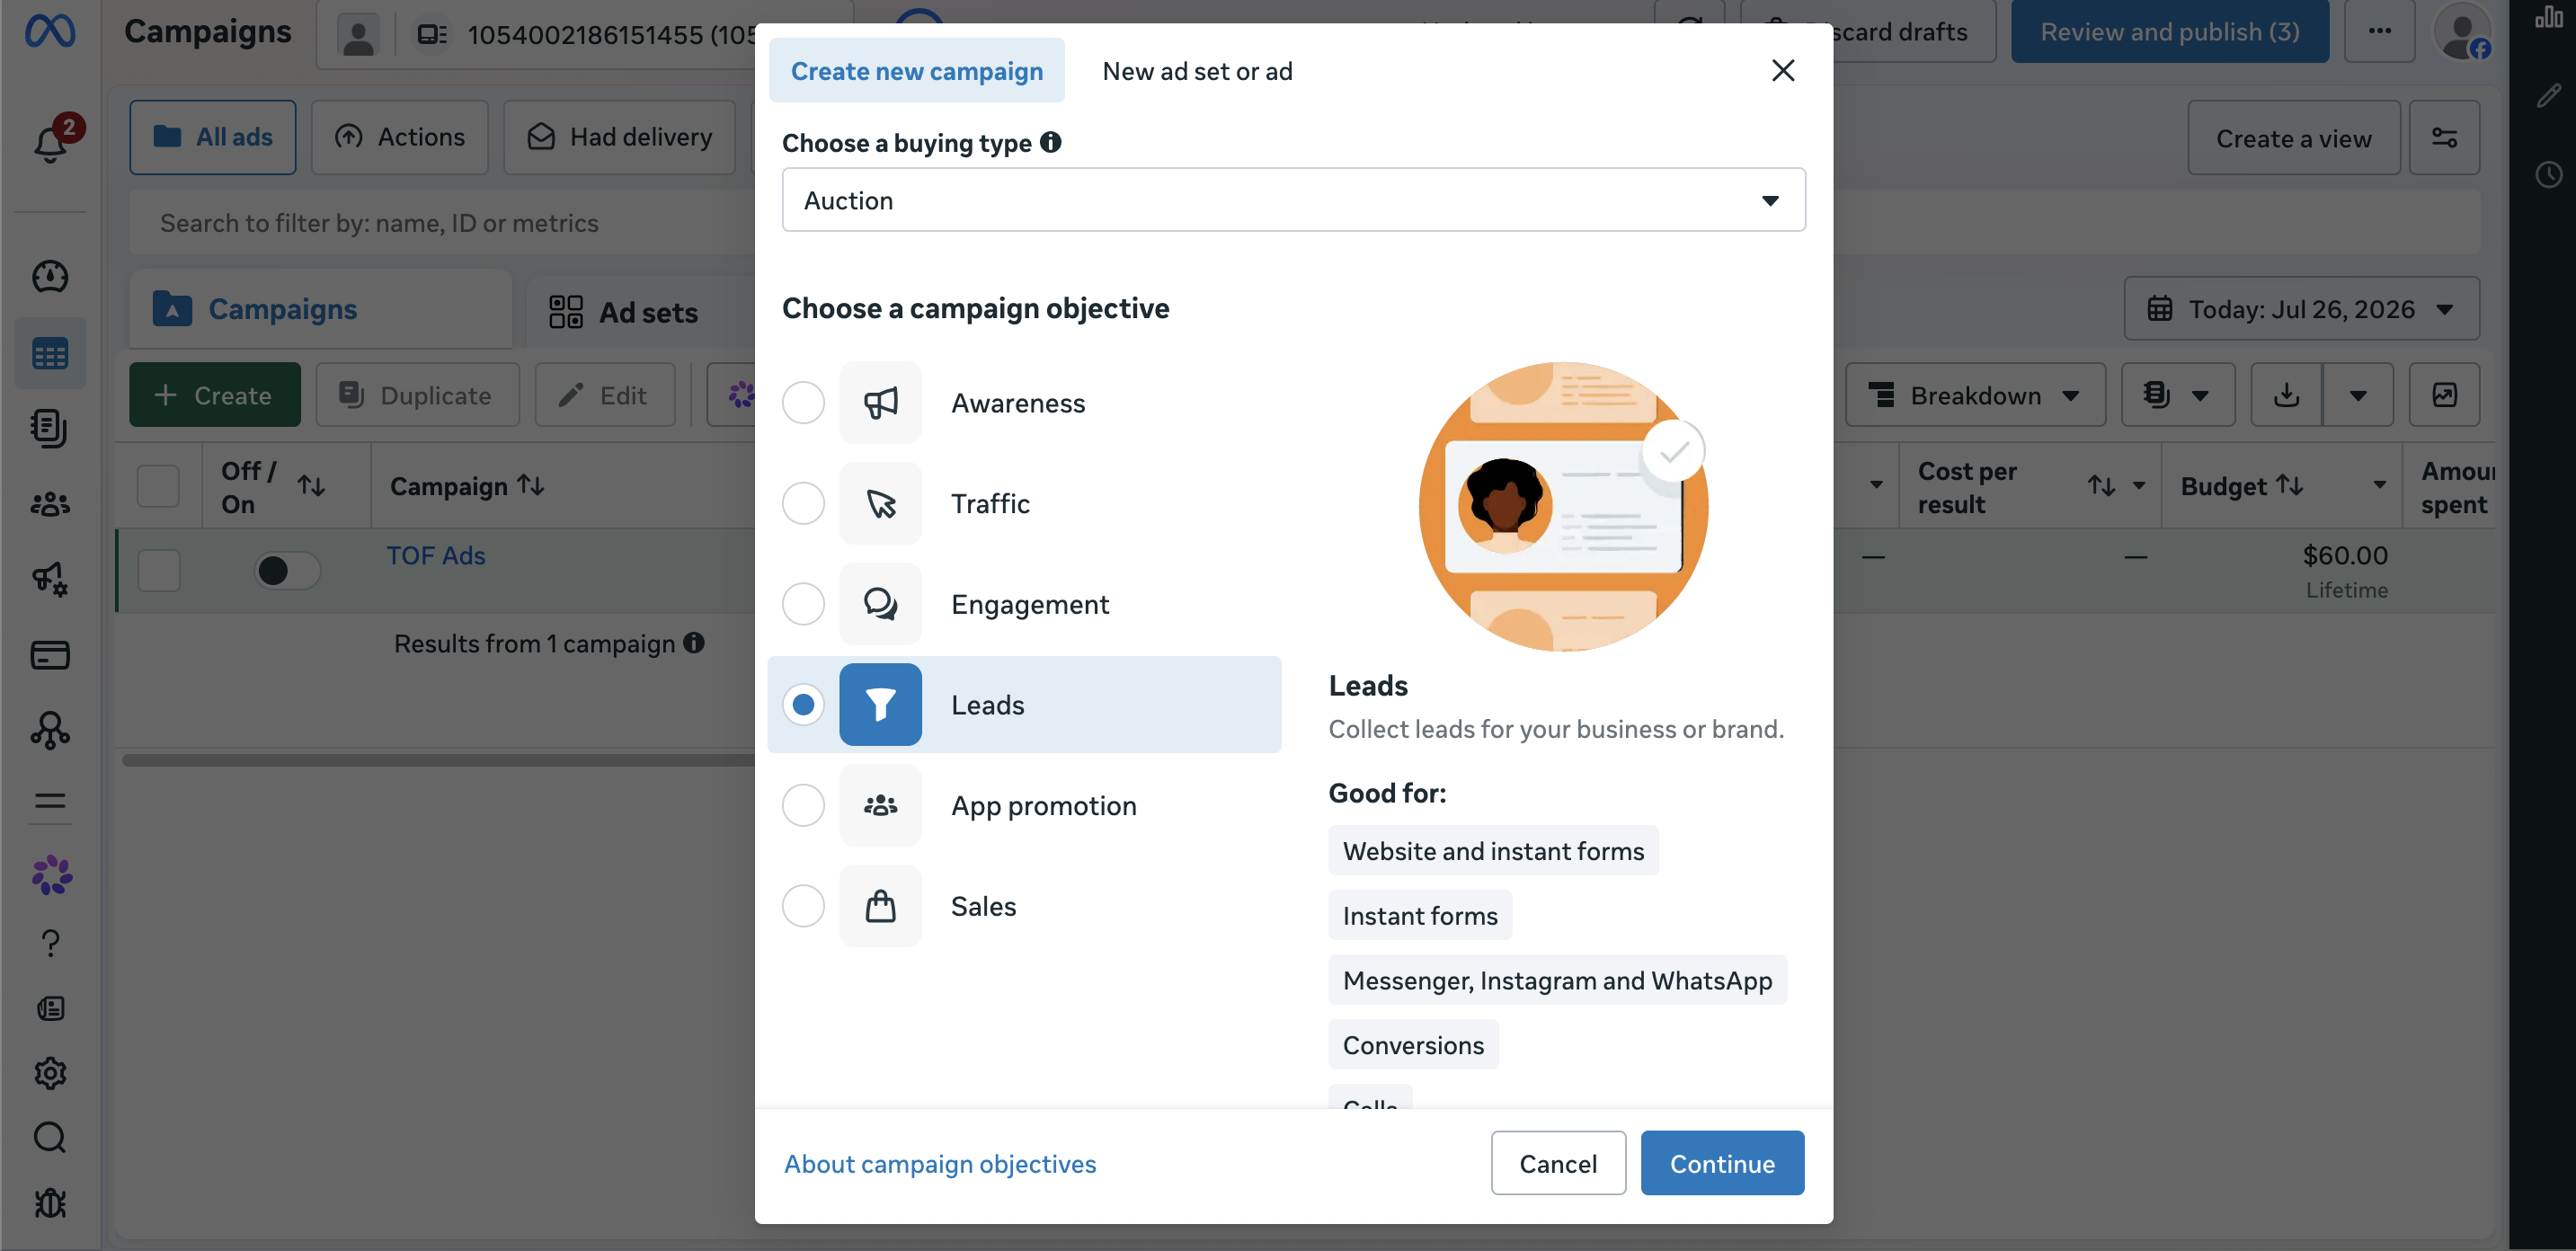
In the Create new campaign window, leave buying type as Auction unless your account requires something else.
Under Choose a campaign objective, select Leads. Meta describes this objective as collecting leads for your business. It works well for messaging destinations including Messenger, Instagram, and WhatsApp.
Click Continue.
Step 3: Name the campaign and review campaign details
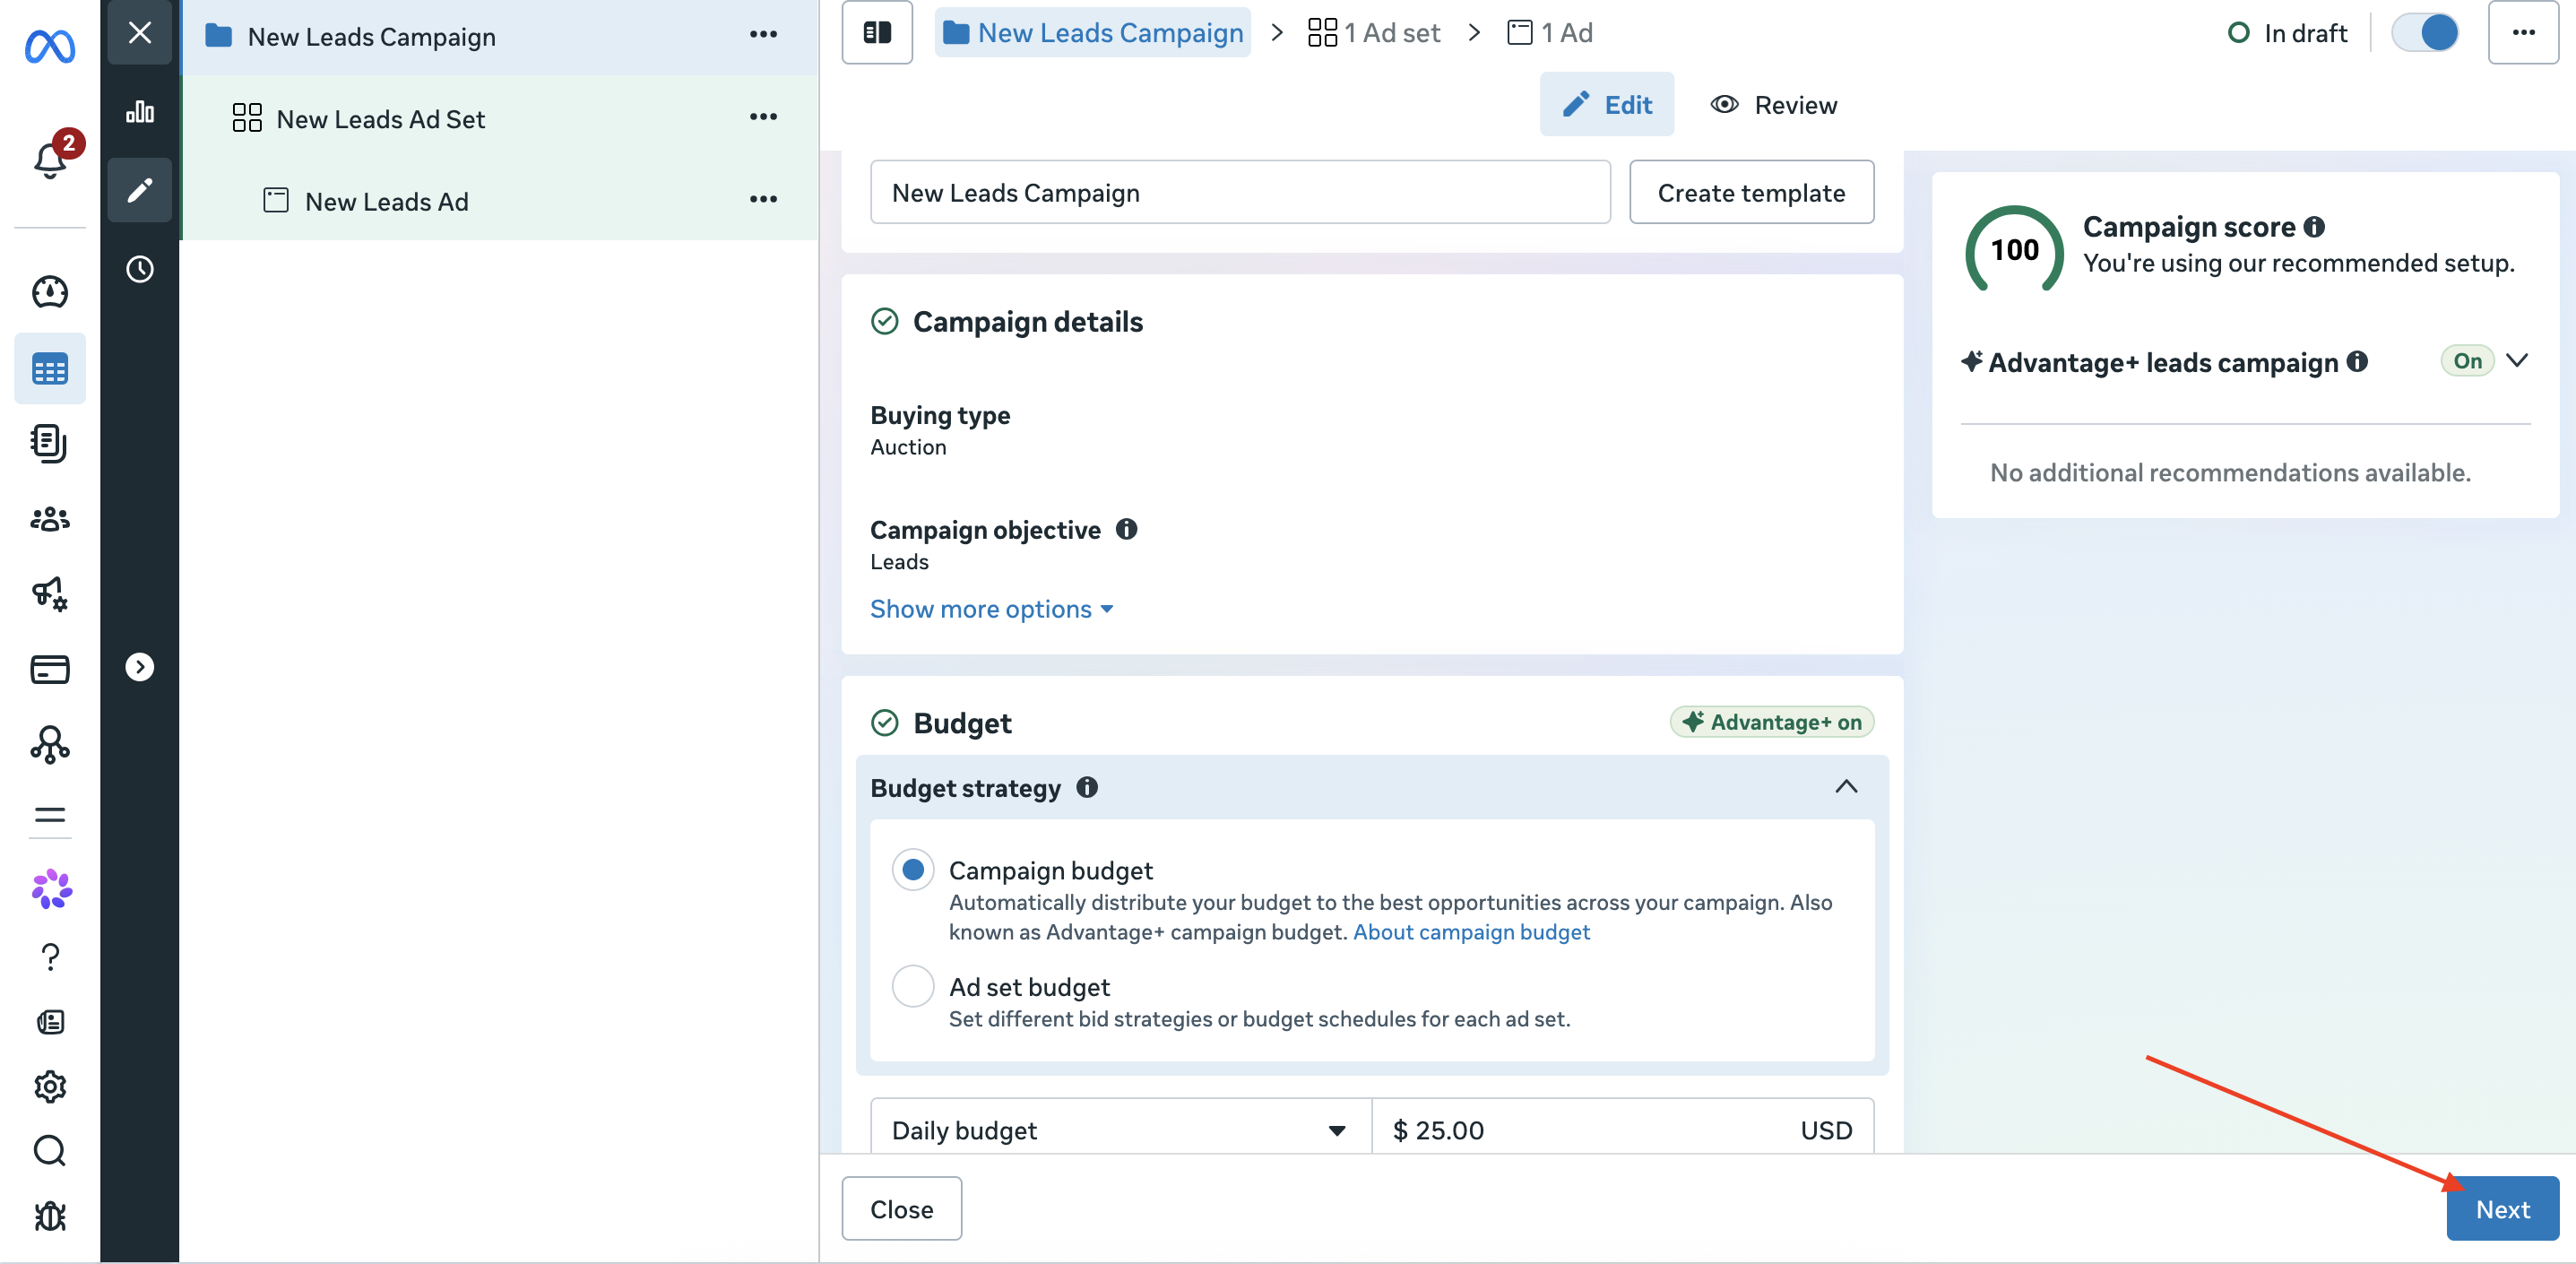
On the campaign setup screen:
- Enter a clear Campaign name (for example
WhatsApp Leads - JulyorCTWA - Product demo) - Confirm the objective shows Leads and the buying type is correct
- Review budget settings such as Advantage+ campaign budget and daily or lifetime budget
When the campaign-level details look right, click Next to move to the ad set.
Step 4: Set conversion location to WhatsApp
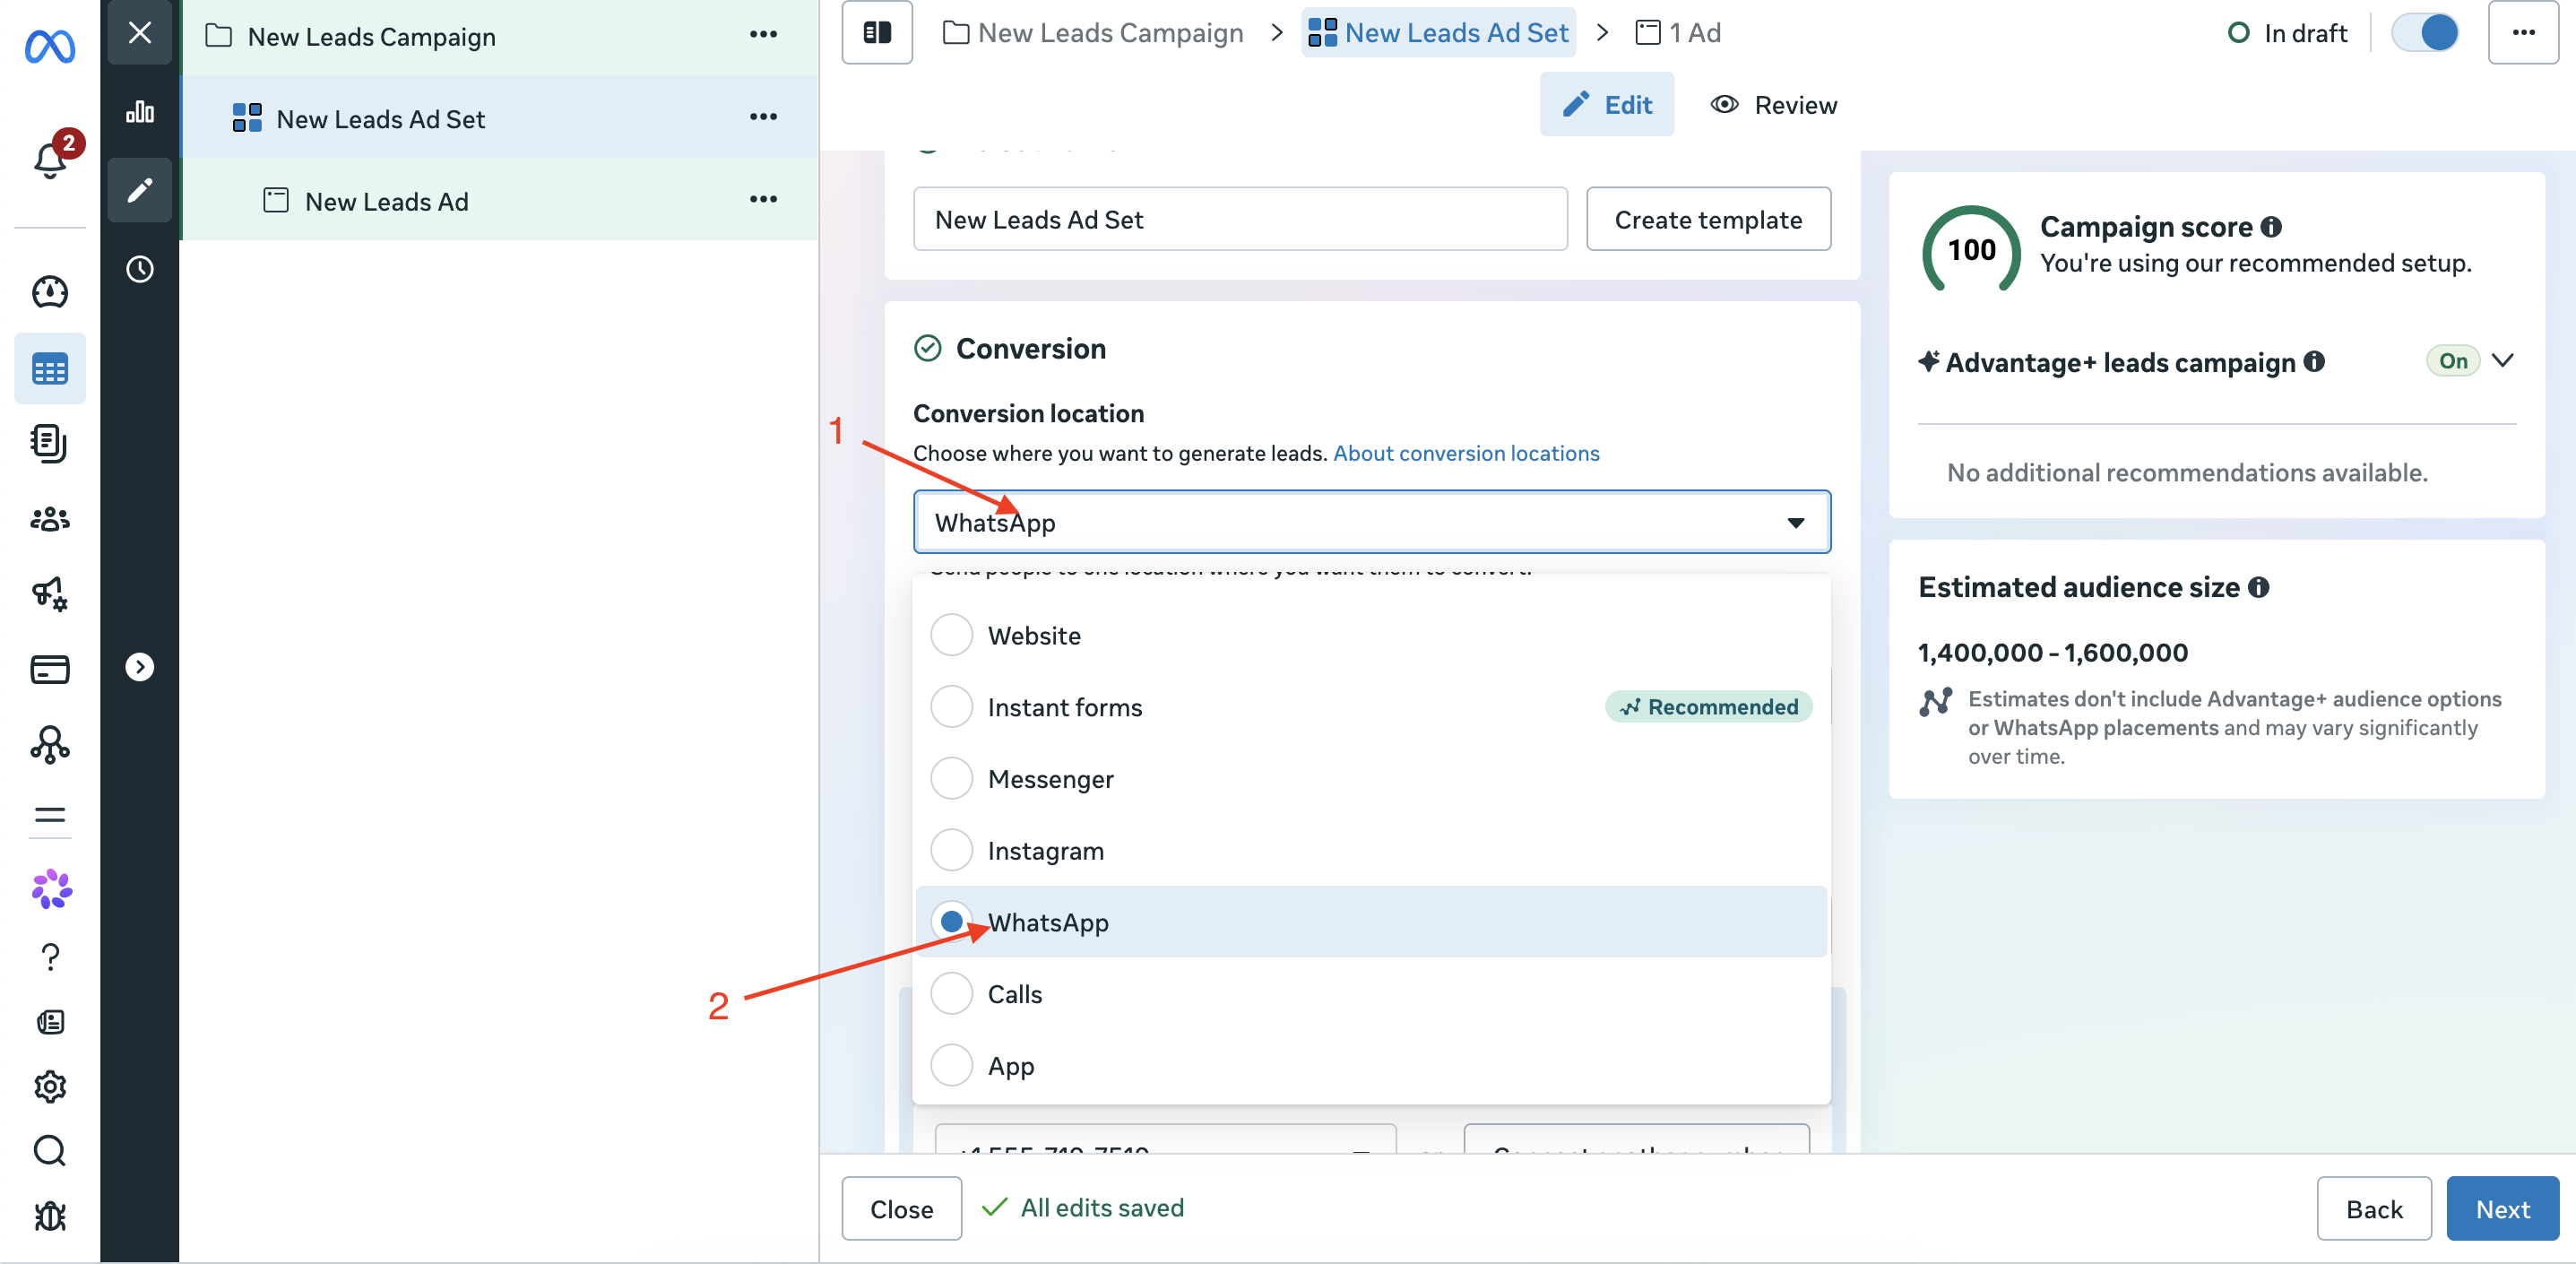
At the ad set level, find the Conversion section and open Conversion location.
Select WhatsApp. This is what turns the campaign into a Click to WhatsApp lead flow. People who engage with the ad can start a WhatsApp conversation with your business instead of only submitting a website form.
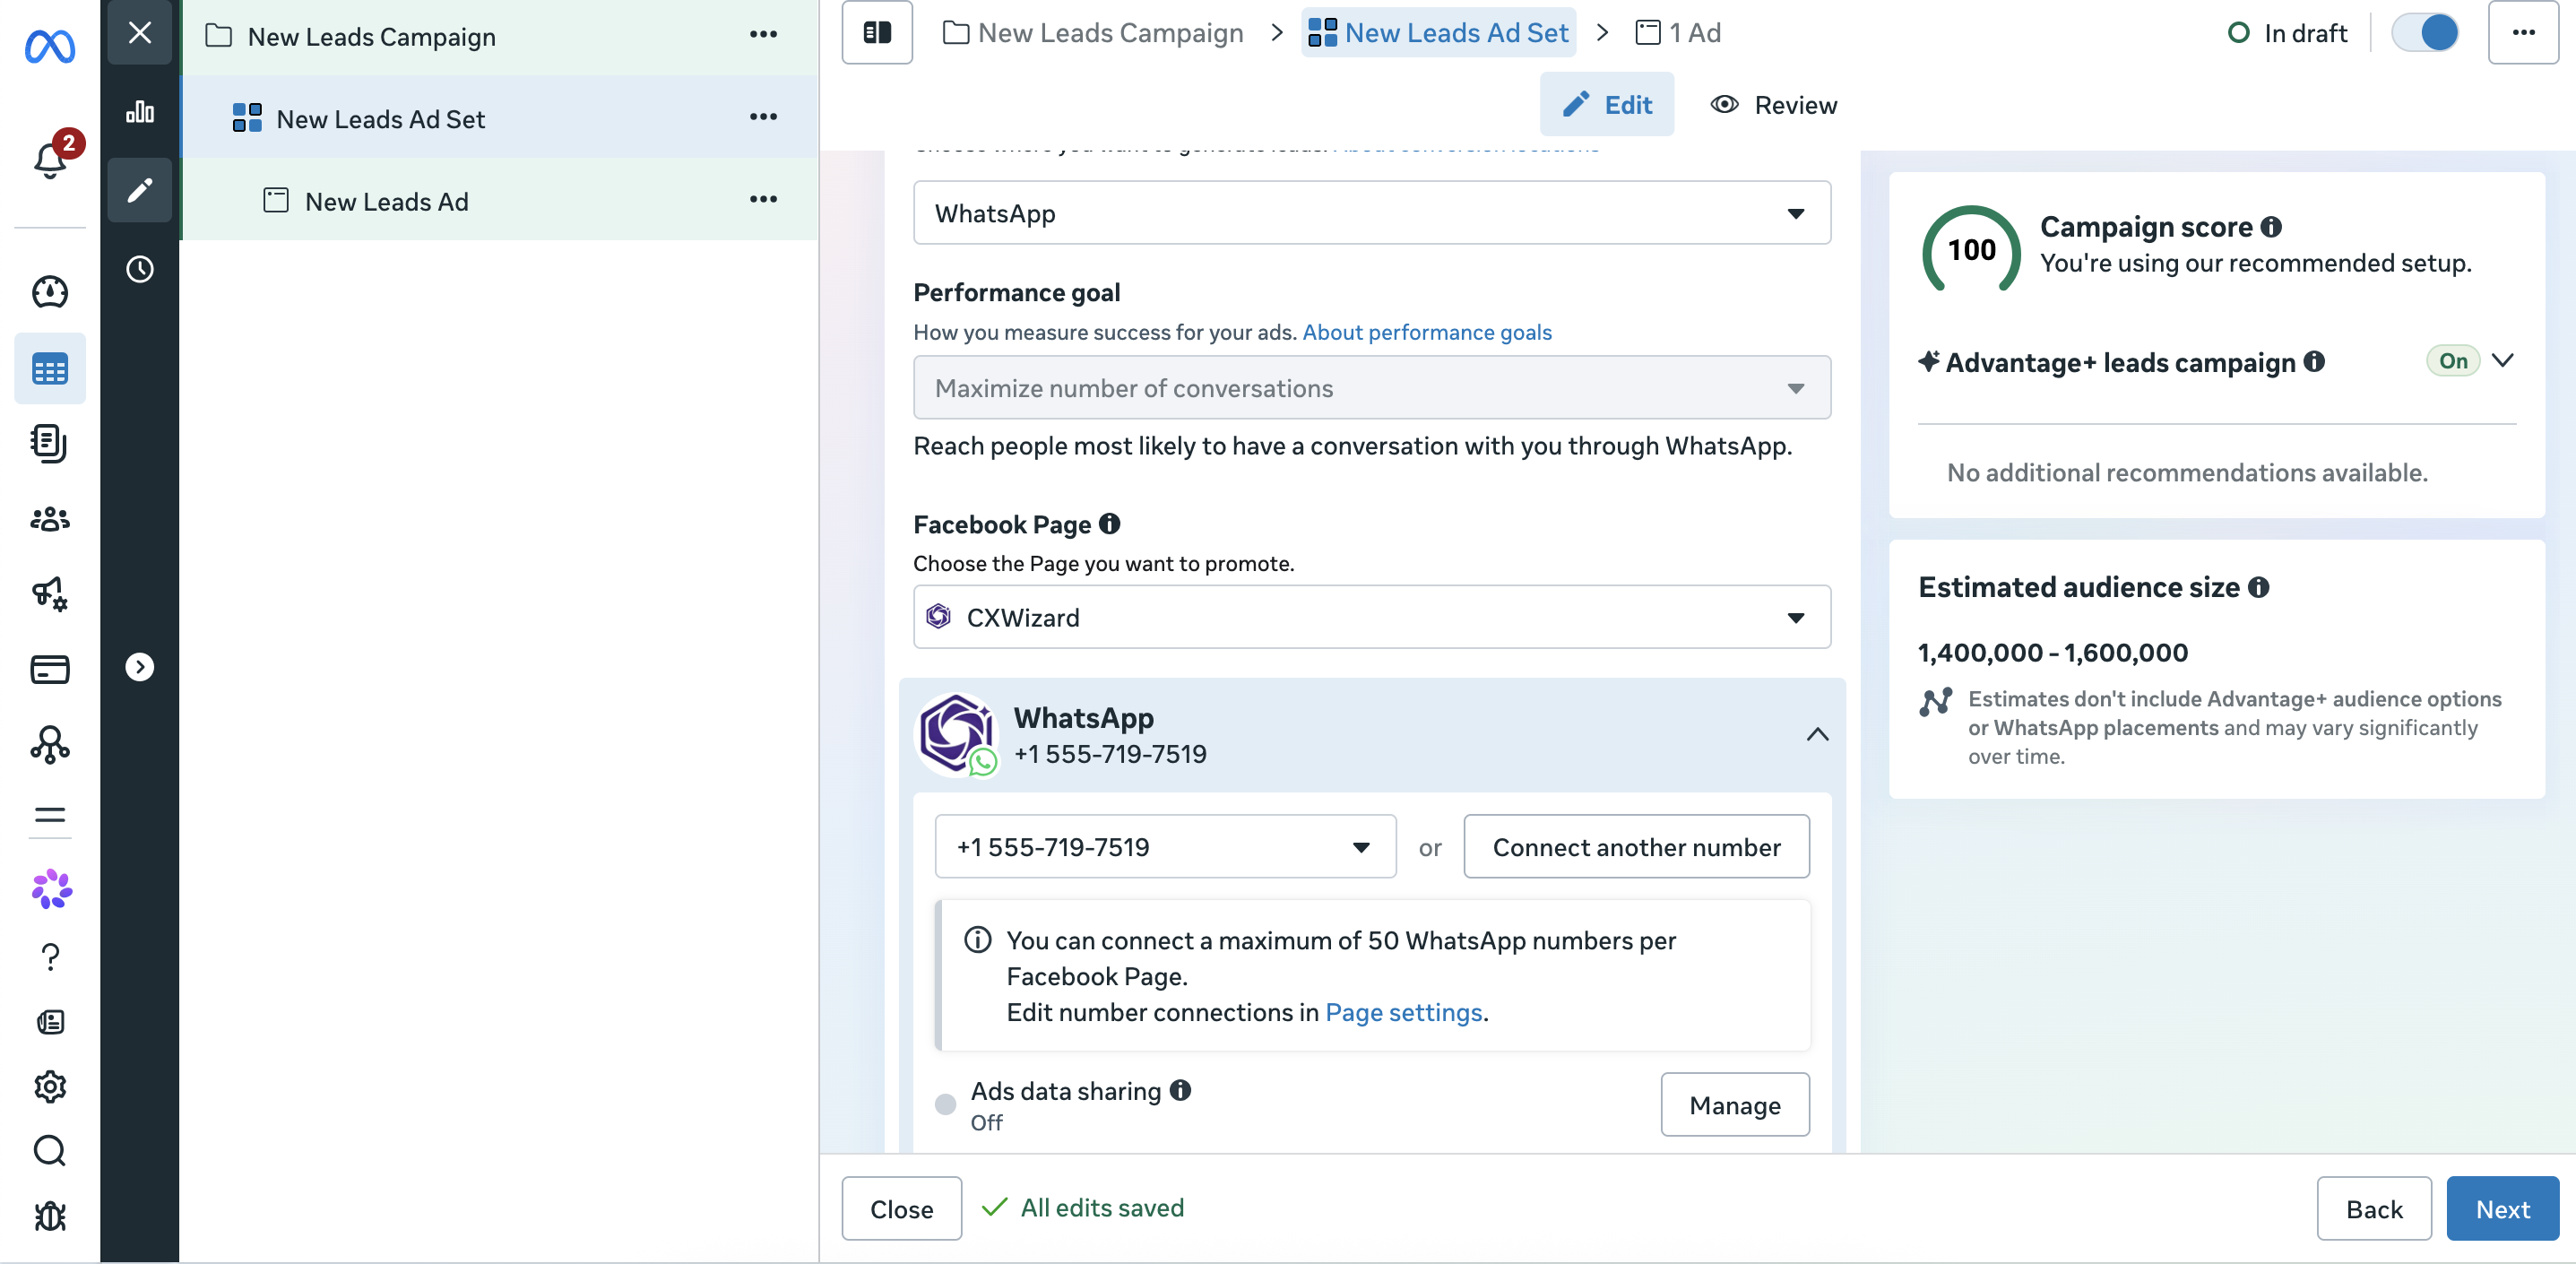
You can also set a performance goal such as Maximize number of conversations so Meta optimizes for people who are likely to chat on WhatsApp.
Step 5: Connect the WhatsApp number for the ad
Still in the ad set, choose the Facebook Page that owns or is linked to your WhatsApp number.
Under the WhatsApp section, select the phone number the ad should open chats with. If the number is not listed yet, use Connect another number and follow Meta’s prompts.
Use the same WhatsApp Business number you connect to CXWizard. That way every ad-generated chat lands where your AI agent and team inbox can handle it.
Click Next when the ad set conversion and WhatsApp connection look correct, then finish the Ad step with creative, primary text, headline, and a call to action such as Send message or WhatsApp message. Publish when you are ready.
Step 6: Set up CXWizard AI to handle the WhatsApp chats
Ads create the lead. CXWizard turns the chat into a qualified opportunity without forcing your team to reply to every message manually.
- Sign up or log in to CXWizard
- Connect the same WhatsApp Business account used in the ad (connection guide)
- Create or refine an AI agent with a prompt focused on sales conversations from ads
- Add product details, pricing, policies, and FAQs to your Knowledge Base
- Enable the agent so it responds to new WhatsApp chats automatically
Configure the agent to:
- Qualify leads: ask budget, timeline, location, product interest, or other must-have questions before handing off
- Close customers: guide interested buyers toward booking, checkout, or the next conversion step
- Answer FAQs, objections, and pricing questions: use your knowledge base so replies stay accurate and on-brand
For the full agent setup flow, see Getting Started with CXWizard. When chats need a human, use How to Let AI Manage Your Inbox in CXWizard so escalations are tagged and assigned.
Your funnel becomes:
Meta Click to WhatsApp ad → customer opens WhatsApp → CXWizard AI qualifies, answers, and helps close → human takes over only when needed
Tips
- Match the ad promise to the first AI reply. If the ad says “Get pricing on WhatsApp,” the agent should lead with pricing and clarifying questions.
- Keep the WhatsApp number, Facebook Page, and CXWizard connection on the same business setup so chats do not land in the wrong inbox.
- Start with a modest daily budget, confirm chats arrive and the AI responds correctly, then scale spend.
- Review early conversations and tighten the agent prompt or knowledge base around common objections.
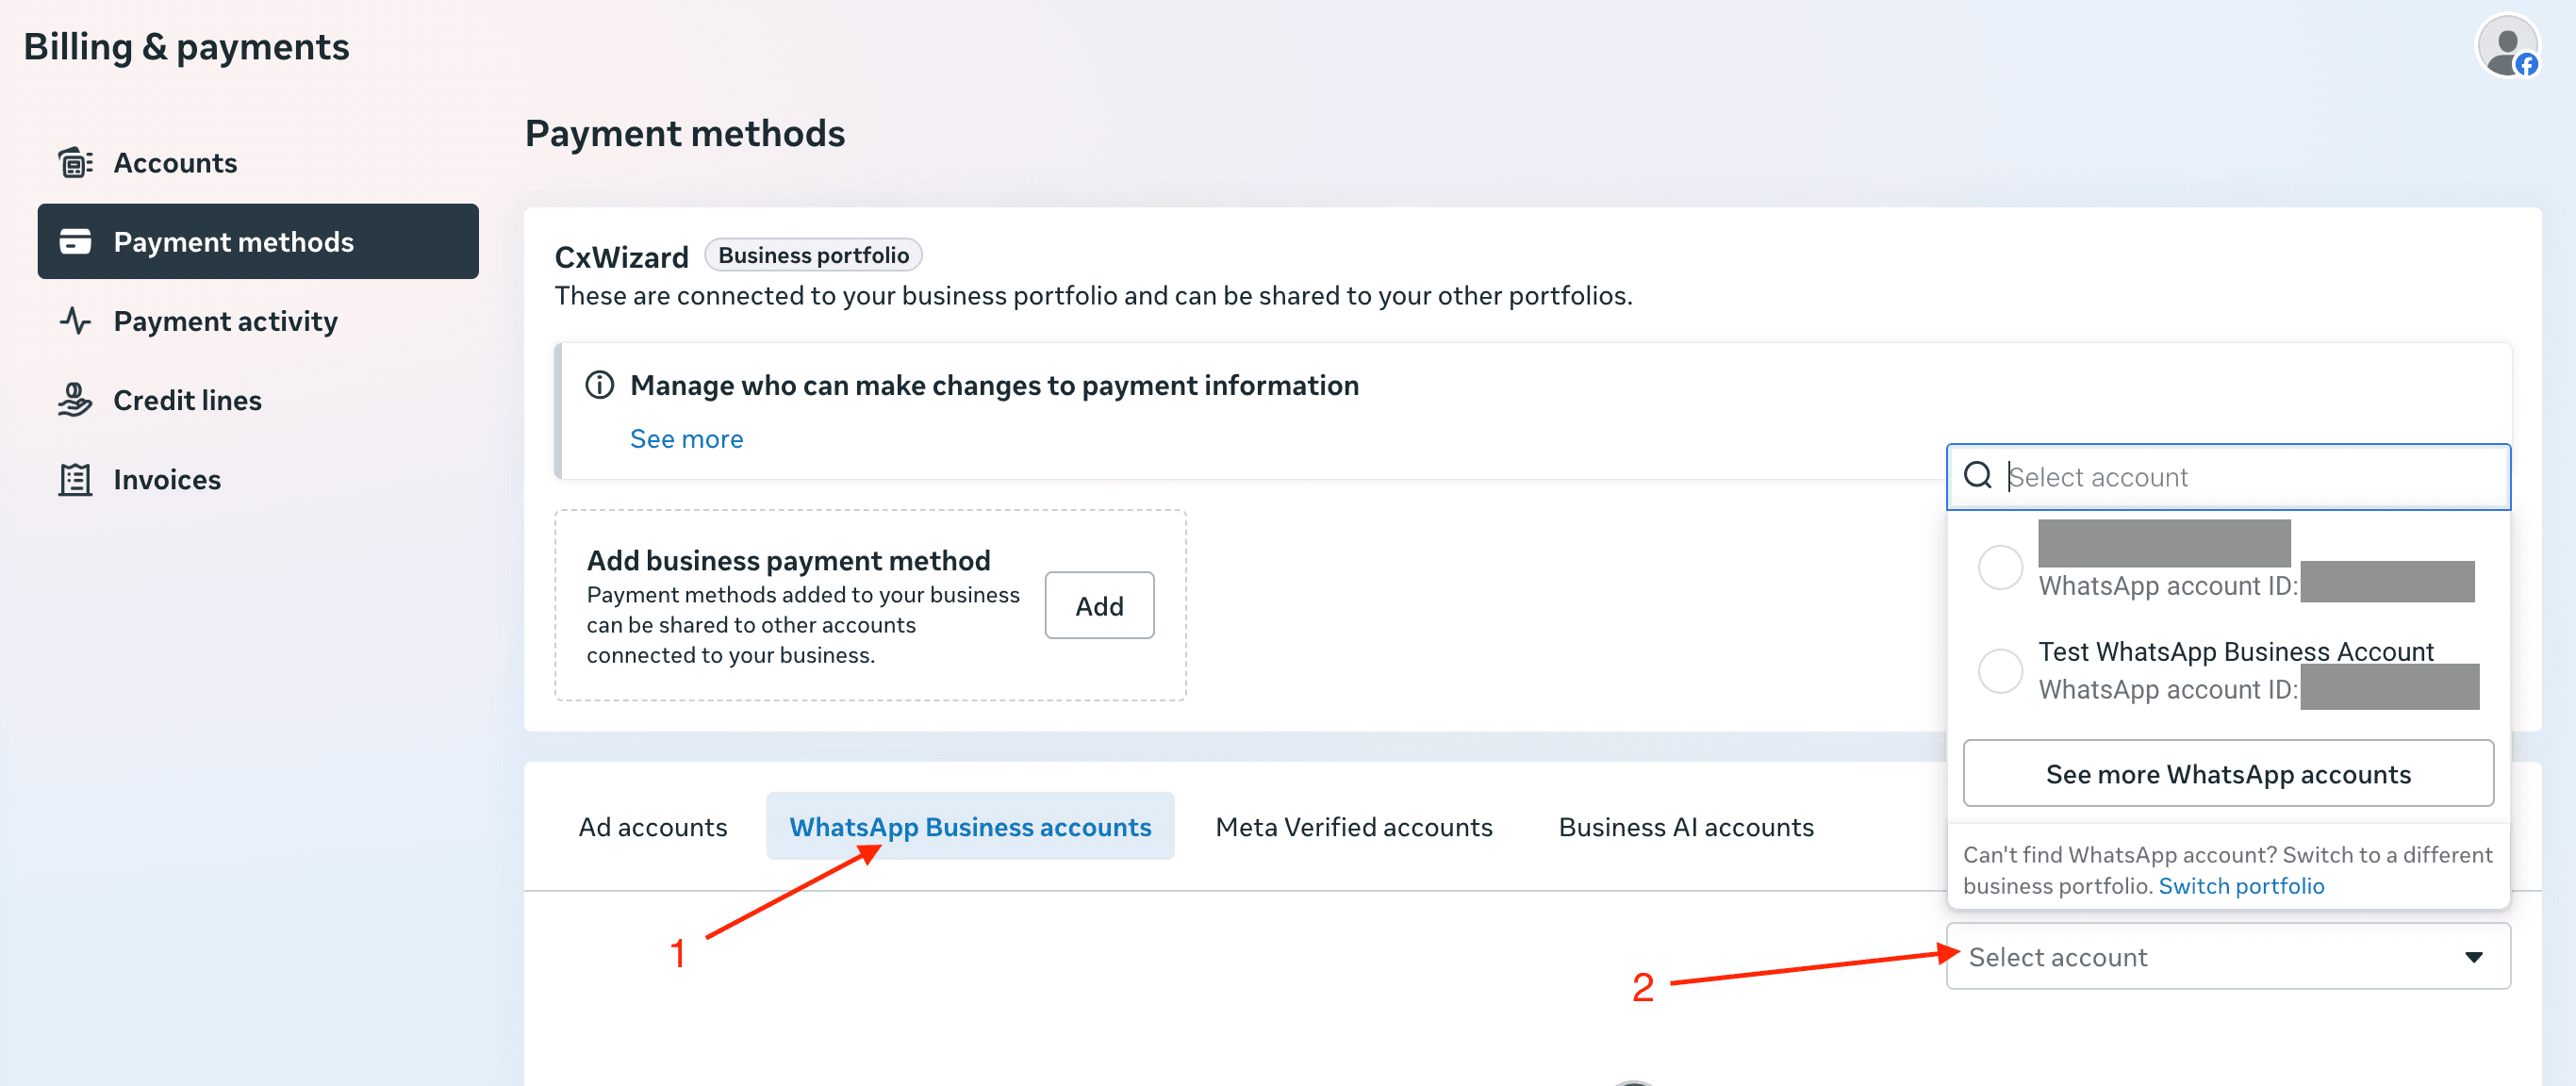
- Make sure Meta billing and WhatsApp messaging fees are covered so delivery is not interrupted. See How to Add a Payment Method to Your WhatsApp Business Account and Understanding WhatsApp API's Per-Message Pricing.
Related tutorials
- How to Connect Your WhatsApp Business Account to CXWizard: Connect the number your Click to WhatsApp ads use.
- Getting Started with CXWizard: Create an agent, build a knowledge base, and enable automation.
- How to Let AI Manage Your Inbox in CXWizard: Route escalated ad leads to the right teammate.
- How a Top Indian Hair Transplant Clinic Scaled WhatsApp Sales with CXWizard: See Click to WhatsApp ads and AI replies at scale.